Sunday, January 29, 2012

Zesty Lemon Bars

I love desserts with fruit in it. Maybe because somewhere in my mind I justify that this is healthier than say, a chocolate chip cookie.   


Lemon bars are delicious, but can be a bit tricky because every person has their own preference (extra zesty, extra tart, super sweet, etc.)  This recipe is really user friendly and you can adapt this recipe to your liking.


If you don't like it too lemony - don't use the zest and just use 3/4 cup of the juice.  Amp this up if you do like the strong lemon flavor.


Either way, I have been LOVIN lemon lately (hehe say that five times fast!)  


I also love the crust on this particular recipe because it tastes like shortbread cookies... yumm!


You'll need:
Crust
3/4 cup of powdered sugar
3/4 cup of softened butter (not melted!)
dash of salt
2 cups of flour


Filling
4 eggs
1 1/4 cups of white sugar
1/4 cup flour (optional)
1 tablespoons lemon zest (basically the zest from all the lemons you use)
3/4 cup to 1 cup of fresh lemon juice (I used 5 lemons)
More powdered sugar for dusting 


Step-by-step:
1. Mix the ingredients in a large bowl for the crust and press into a pan.  You can use a 9x13 for thin bars, or a casserole dish or 9x9 for thicker bars. 
2. Bake the crust for 15-18 minutes at 315 degrees (we don't want it to be brown or crunchy)
3. While this is baking, start making your filling. 

4. Mix in all your ingredients (be sure to make sure no seeds go into this!)
5. Pour over the baked crust (it will be very runny) and put this in the oven at 350 degrees  - Make sure you've increased the time!

 6. Bake for 20-25 minutes (20 if you use the larger size pan, 25+ for a smaller pan and thicker bars)
7. Wait until the bars are completely cool, then sprinkle powdered sugar on top.  If you sprinkle powder sugar before it's cool the bars will absorb the sugar! 
8. Store covered
9. Enjoy!

-Domesticated Duchess 

Wednesday, January 25, 2012

A Dash of Everything

This blog post is not a recipe.  It's not a food review.  It's not a craft or project.  It's just a post...  still food related, of course. After all this is a food blog.  But, there are three things I wanted to write about.

 3. GOOGLE.  Google is smart y'all (did that sound really redneck, or was that in my head?).  I mean google can tell me how to get anywhere in this giant metropolis, it can find the Heisman trophy in 1957, but most importantly it can help my recipe book!  Several months ago I found this delicious breakfast casserole online.  I scribbled it down the recipe on a piece of paper (old school!), because this was in my BB area (before blogging).  The breakfast casserole was a huge hit, and - bonus - it was easy to make.  Then, a tragedy struck. I lost the paper which had my recipe. Gone. Lost. Missing without a trace.  I dreamed for months about the breakfast casserole that would never be again. Until google.


Google recipes is amazing.  It is seriously a cooks secret helper.  A little gift from Santa to us bakers, chefs, and culinary enthusiasts. You can plug in what ingredients you need, and even how many calories and recipes will pop up.  My beloved recipe was found!  And what a joyous (and delicious) day it was :)


2. Pinterest is amazing.  I love it.  I discovered it on Memorial Day weekend and have been hopelessly addicted.  You can follow me by clicking here.  It's probably my most used app on my iPhone.  I find SO many wonderful recipes and crafts!  It's a good source of inspiration... the only problem is trying to pick just which one to start on!


1. YOU!

I have been blogging for just over six months, and the past three months I've seen a dramatic increase in the number of hits. There are literally thousands of food blogs and sites out there, so if you take the time to read mine THANK YOU!  Blogging is just a little hobby, but it's kind of nice to know the only person reading is not my mum :)


- Domesticated Duchess


Monday, January 23, 2012

Homemade Bagel Bites

This is a super simple recipe idea, and an awesome idea for a snack or just add a salad and serve for dinner!  If you're looking for other snack or appetizer ideas, my Cream Cheese Garlic Chicken Poppers are a family favorite!


Bagel bites were definitely a hit in our household growing up. We loved those things more than any after-school snack - the hard part was convincing our mom we *needed* them!  I decided to make some "grown up" bagel bites.  These are WAY less expensive (a box of BB's are about $3.50 for 9).  The cost of my bagels was about $3.50, but got 24 bites. 

They are also healthier (you can use low fat cheese and whole wheat bagels).  They are also very filling - much more filling than the boxed kind!

 
You'll need:
6 mini-bagels (split in half)
~3/4 cup of pasta sauce (I love Emril Agassi's)
~3/4 cup of mozzarella cheese 
1/2 cup of pepperoni, chopped
Italian seasoning


Step-by-step:
1. Preheat oven to 425
2. Take a large baking pan and cover with foil.  Use cooking spray to grease.
3. Split each bagel in half on the foil
4. Cover with pasta sauce (I use 1 1/2 teaspoons per bite)
5. Cover in cheese (1 - 2 tablespoons)
6. Sprinkle chopped pepperoni or other toppings on bagel
7. Dash italian seasoning on each bite
8. Bake 9-11 Minutes, then put on BROIL for the last 2 minutes


You can use your favorite pizza toppings... left over ground beef, veggies, etc.


To FREEZE: 
After prepping the pizza bites, do not bake.  Place on a baking sheet and FLASH FREEZE for about twenty minutes.  Then put them in sealable freezer bags.  To serve them up you'll cook them for about 15 minutes at 425.  I would recommend to consume them within 3 months. 


-Domesticated Duchess

Sunday, January 22, 2012

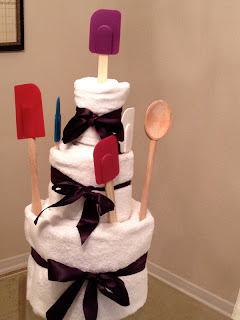
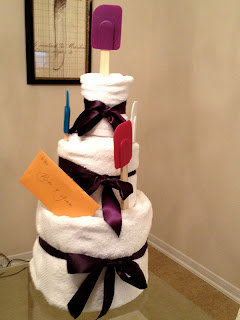
Wedding Shower Towel Cake!

I am a bridesmaid in a friend's wedding in just about one month!  With the wedding close, all the "funtivities" are starting - bachelorette party and wedding showers! 

In the invite for, the wedding shower it said to please have a ribbon with your gift.  With that, I decide to make my gift something fun and special!  The couple registered for some white towels on one of their gift registries.  I took advantage and made this fun Wedding Shower Cake, made of towels!

It looks hard, but it's really not.  My mom and I did it in about 30 minutes! 

You'll Need:
2 bath towels
3 hand towels
2 washcloths
Ribbon
About 20 safety Pins
Spatulas, Spoons, and other nick-nacks for decor!

Step-by-step:
1.  Fold the bath towel in half, lengthwise.  Make sure the ends are even.
2.  Take the towel again, and fold it in half, lengthwise. (So you will fold the towel in half, then again in half).  If you remember your kindergarden ways, this is hot dog ways rather than hamburger. 
3.  Repeat step 1 and 2 with the second bath towels.  If you folded carefully, the ends should be the same.  
4. Take the two towels, and put them together so it is a super long towel. Pin one of the folded bath towels with two safety pins on one side.  Flip over and use two more pins.
5. Starting at one end, carefully roll the towels in one long roll. Roll as tightly as you can.  Smooth out any wrinkles before you start to roll!  If you have rolled this correctly, the top will be flat!
roll tightly
top should be flat
6. Using ribbon tightly tie a ribbon and make a bow around the layer.
pretty!
7. Repeat with the hand towels and washcloths.  The difference is you will need 3 of the hand towels. Place the roll of the hand towels on top of the roll with the bath towels, and the washcloths over the hand towels.  Again if it is tight and neat, the top should be flat!  Add ribbons around each layer of the cake.
8. Here is the fun part! Take some of your utensils to "stake" in each layer.  You will want to stick the utensil through the layer, and into the layer below. The most fragile layer is the middle layer as it is connecting two layers of the cake - I used two cooking utensils on the middle layers to make it sturdy.  I used one utensil for the top.  The rest of the utensils/nick-nacks you can just decorate with all over.

Other ideas include: wine stoppers, chip clips (they come in fun colors), wooden spoons, spatulas, even a gift card. 

- Domesticated Duchess


Tip:  The neater the folds, the better the cake will look!

Thursday, January 19, 2012

Skinny Creamed Spinach

With the start of the new year, it also seems like EVERYONE starts a diet/exercise/healthy lifestyle.  Some people are committed, some people stick with it just for a few months (or weeks).  If this is you, this low calorie creamed spinach is low in fat, and pretty delicious too!


Here's the skinny....


You'll need:
16 oz bag of frozen chopped spinach
2 servings of neufchatel cream cheese (1/4 of the package)
4 oz plain greek yogurt
1 teaspoon garlic salt
dash of pepper


Step-by-step:
1. Thaw out spinach for about 30 minutes. Pour spinach in large pot until thawed out and a bit warm.
2. Add in the cream cheese, and stir.  Then add in the garlic salt and pepper.
3. Pour in greek yogurt and stir until very smooth. Stir occasionally for about 3 minutes until thick.
4. Remove from heat, and enjoy warm!


I always add a dash of parmesan cheese on top for extra flavor!


Calorie Breakdown
Spinach: 150
Cream Cheese: 140
Greek Yogurt: 70
Spices: 0
TOTAL = 360 calories; 4 servings 90 calories per serving!


You can even trim off more calories by buying fat free cream cheese!


-Domesticated Duchess

Tuesday, January 17, 2012

Buffalo Chicken Calzone

The Superbowl is coming up, and one of the best parts of the Superbowl is of course the food. And the commercials.... and I guess the football part too. This recipe is a PERFECT meal to bring to a Superbowl party.


This amazing recipe is adapted from one of my very best friends Emily's recipe.  Emily just got engaged on New Year's Eve and I am excited for her!  Emily and I have been friends since SIXTH grade.  That means we were 11 years old. This means I have been friends with her for over 50% of my life.  Her fiancee Will is also a super nice guy, and I just can't wait for the wedding in December of this year!  They are truly the best engaged couple I know :)


Anyway, about a year ago Emily was talking about what she ate for dinner and it sounded so mouth watering I made her email me the recipe.  I made a few alterations from her recipe and here it goes...


You'll need:
1 can of pizza dough
2 tablespoons of ranch dressing 
1 - 1 1/2 cups of mozzarella cheese
1 pound of grilled chicken (shredded is easier to eat and preferred, but chopped chicken works too)
1/2 cup of hot sauce (I LOVE Frank's hot sauce, it's the only one I use)


Step-by-step:
1. Grill your chicken and season per usual. I grill mine on a skillet. Then shred or chop.
2. In a small bowl, take the chicken and pour in 1/2 cup of hot sauce, mix until the chicken is completely covered in sauce. 
3. Take a large baking pan and grease generally. Take the can of pizza dough (I used pillsbury), and roll it out using a rolling pin. 
4. Put ranch dressing on one half of the pizza dough. 
5. Pour the chicken over the ranch dressing, and cover the chicken with mozzarella cheese (this will still leave one half of the dough untouched)
this is where I start to get hungry
6. Fold the half of the rest of the dough over the chicken/cheese mixture and pinch around the edges to seal it.
7. Use a tiny bit of olive oil on top of the sealed calzone, and use a bit of seasoning to add flavor (I like Italian seasoning for this).  Using your fork, poke some holes to let the steam out/ventilate, or use a knife and slit the dough a bit.
8. Bake at 400 degrees for about 17 minutes or until golden top.  The heat is VERY sensitive, so keep a close eye on it every 5 minutes.


Alternatives: I have used BBQ sauce instead of hot sauce and it was amazing. Emily's original recipe calls for cream cheese rather than mozzarella, and she used bleu cheese rather than ranch!  You can also sub out fried chicken tenders instead of grilled. No matter what you do, it is DELISH! 


Also, if you're feeding a big crowd, you can double the entire recipe and use the second pizza dough to cover the top one!  I've done this before and it worked just fine!


There ya go, a classic Superbowl treat!  Now that the Texans are no longer in the playoffs (sniff), I no longer cares who the victor is. 


-Domesticated Duchess

Wednesday, January 11, 2012

Peanut Butter Chocolate Swirl Bars

Peanut Butter and Chocolate are a match made in heaven.  So without further ado... Peanut Butter Chocolate Swirl Bars!

this picture makes me hungry each time i see it. oops! 


You'll need:

1 package of yellow cake mix
1 stick of melted butter + 2 tablespoons (divided)
1 cup of creamy peanut butter 
2 eggs
1 package of chocoalte chips
1 can sweetended condesned milk (14 oz)
2 teaspoons vanilla


Step-by-step:


1. Preheat oven to 325 degrees
2. Combine cake mix, melted butter, peanut butter and eggs in a large bowl.  Press into a 9 x 13 pan, reserving 1 3/4 cup of the mixture to crumble on top

3. In a small sauce pan, melt chocolate chips, condensed milk and butter. Remove from heat and stir in vanilla

4. Spread chocolate mixture over the pressed in the pan and then crumble the reserve mixture on top evenly, and swirl with a spoon

5. Bake for 20-25 minutes and cool completely before cutting into bars.


a side view... kind of looks like a s'mores bar! Although the s'mores bar in my opinion is the BOMB!


If your 2012 resolution is to lose weight, please click here instead.  Stay away from this recipe if you're trying to eat healthy!!! 


-Domesticated D

Sunday, January 8, 2012

White Chicken Enchiladas

True Life: I have never eaten an enchilada. I know it is a major shocker, especially since  I love Mexican food.  


If I go eat Mexican, I always order the same things: fajitas, quesadillas or taco salad with the creamy jalapeno or cilantro dressing.   However, when I saw this recipe I got instantly hungry and decided to make it for dinner.

White Chicken Enchiladas with Sour Cream and Green Chile Sauce... that's a mouthful - pun intended!

To make these White Chicken Enchiladas with Sour Cream and Green Chile Sauce....


You'll need:
10 soft taco shells (you can use any time, but I used cayenne pepper for extra spice)
2 cups of cooked, shredded chicken 
2 cups of shredded cheese (I use Mexican Cheese)
3 tablespoons of butter
3 tablespoons of flour
16 oz of chicken broth (low sodium for healthy heart!)
8 oz sour cream
4-6oz of diced green chilles 


Step-by-step:
1.  Preheat oven to 350 degrees.  Grease your favorite casserole pan.
2. Mix chicken and 1 cup of cheese.  Roll up in tortillas and place in pan.
3. In a sauce pan, melt butter, stir in flour and cook 1 minute until thick. Add the chicken broth and whisk to smooth.  Heat over medium heat until thick and bubbly
4. Stir in sour cream and chiles.  Do NOT bring to boil, or your sour cream will curdle!  Just make it warm and tiny bubbles.
5. Pour the sauce over enchiladas and top with the remaining one cup of cheese
6. Bake 24 minutes, and then high broil for 3 minutes to brown the cheese


YUMMY!


Tip to perfectly shredding chicken: Put the warm/hot chicken in smaller pieces (size of chicken strips works) into your Kitchen Aid Stand Mixer with the cookie paddle attached.  Turn it onto speed 4-6 and in 30 seconds you will have restaurant style shredded chicken!  Chicken has to be warm before you shred it, or if it is cold (refrigerated) it can harm your mixer.


-Domesticated D


SOURCE:  Joyful Mommas Kitchen

12 for 12: Top Twelve Food Bloggers in 2012

I like lists.  I keep a well-maintained and ever-running list of recipes I need to try.  An organized grocery list (in order of how I maneuver through the store). I even have an unofficial list of my favorite Christmas movies.  


This list is in no particularly order, but these are some of my favorite food bloggers. There are so many great food blogs out there, that I'm honored you are reading mine :)


If you enjoy mine here are some other amazing blogs out there:


12. TableforSeven
This sloppy joe recipe is reason enough to be on this list! My husband has loved sloppy joes since birth, and this is his favorite recipe to date!


11. Cookies and Cups
Shelly's site is amazing.  I can't begin to describe how much I love it.  I feel like when my blog grows up, it should be like Shelly's!  Sugar, sugar and more sugar! Seriously, this blog is magical. 
Wedding cookies! My friend Heather is getting married in six weeks, and my friend Emily just got engaged!


10. Erin Cooks  
Erin has made every kind of food you could ever imagine, and has been published in the NYTimes. She rocks!


9. Joy The Baker
Joy (hence the name) has an amazing site.  The main reason I love it though is the pictures.  Seriously, I've never been into photography (hence my low quality photos) but she inspires me to one day try.


8. Paula Deen
Paula, the food network giant, has single handedly made me realize it is OK to use butter.  There is no substitution that can take it's place.  All those spreads should never be used in cooking. So thanks for the love-handles, Paula ;)


7. TidyMom
A recent find Cheryl has great recipes and I'm looking forward to trying more of her delectable recipes!


6. Plain Chicken
Delicious recipes that will make everyone around your table happy.  Just all around great food, and my default stop to try a new recipe. 


5. I Am Baker
I love this blog because the great tutorials.  She's got two beautiful tutorials on rose and hydrangea cakes! 


4. Pioneer Woman
I feel like Ree and I would be friends in real life.  She is funny, quirky and real. She has good recipes, funny stories, and great photos!  This is also one of the first blogs I've actually continued to follow for years.


3. Two Peas and Their Pod 
I like this blog because it's a wife and a husband and their cooking adventures! Plus one of my favorite cookie recipes is adapted from here!


2. Lauren's Latest
LOVE this blog.  Lauren has something new everyday (quite literally) and it I always end up salivating. 


1. In Katrina's Kitchen 
Katrina has *really* yummy food, guest bloggers and CUTE kiddos!


..well hello there gorgeous! 


Check it out!


-DD